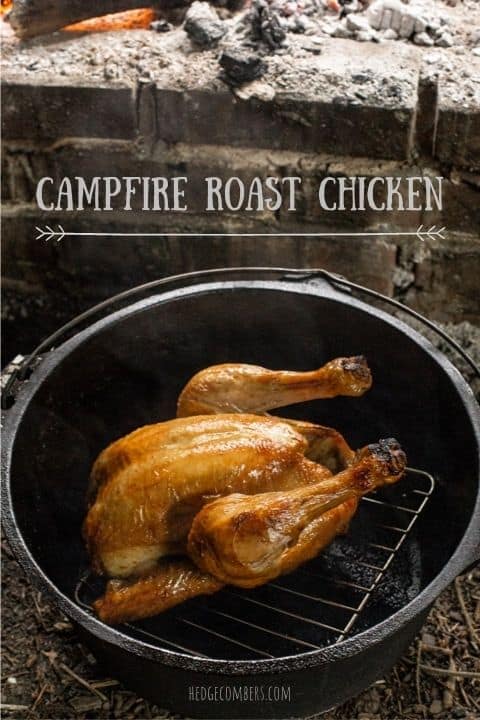
Cooking a Dutch Oven Roasted Chicken over the embers of a campfire will ignite your inner caveman and make your friends very, very happy!
This sponsored recipe post was originally published in 2016
This recipe takes all the things I love the most. Being outdoors, real wood fires and of course good food.
And morphs them all together in the most basic, yet tremendous meal.
It is campfire cooking at it’s most simple, using just one ingredient, and imbuing it with a hint of woodsmoke that all good outdoor meals deserve.
Cooking over a campfire, and especially in this hands-off approach, is just so relaxing.
You don’t want to wander too far from the fire, so grab a comfy chair, a good book and a brew and settle yourself down.
Over time the crackle of the campfire turns into the sizzle of the roasting chicken.
And the smell of woodsmoke occasionally gets peppered with the waft of meat cooking.
It’s a wonderful experience. And one that I recommend you enjoy with all your senses.
And definitely switch any tech off before you settle, so as to avoid distractions.

How to Cook a chicken in a Dutch oven
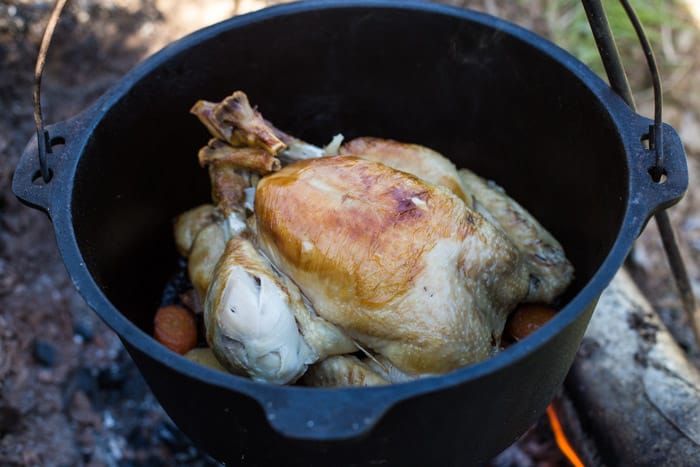
When roasting a whole chicken in a Dutch oven, you want to raise the meat of the base of the pan to prevent it burning.
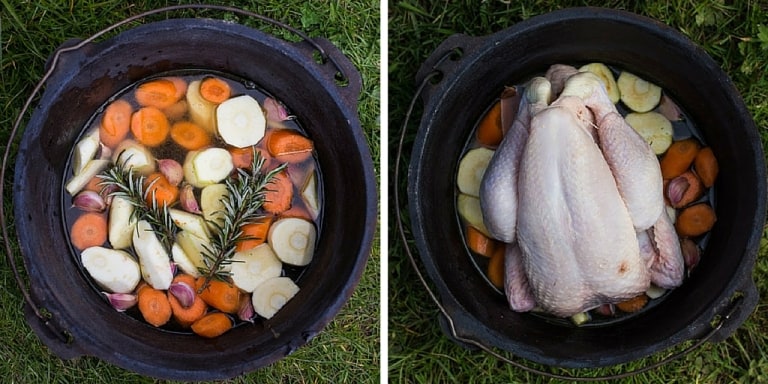
The first time I cooked a chicken this way, I used a layer of root vegetables on the base.
I wasn’t too worried if they burnt (and they did indeed end up being sacrificial!).
But they kept the meat safe and it came out moist, tender and delicious.
This past weekend we went camping and I wanted to remake this recipe for some updated photos.
Rather than wasting all those veggies, I placed a trivet at the bottom of the Dutch oven, sitting the chicken on that.
As you can see my trivet doesn’t actually fit the pan. But it served the purpose perfectly!
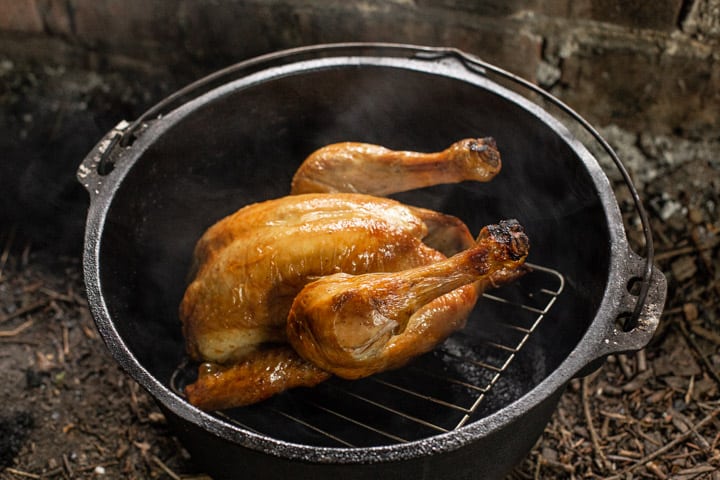
The trivet allows the heat to circulate around the whole bird, getting that gorgeous crispy skin all around. And it keeps the meat safely off the base too.
How to Prepare the Perfect Campfire for Cooking
I aim to get the fire going at least an hour before I want to start cooking on it.
Initially, just get that puppy HOT!
Build it big, and about twice the size of the actual cooking fire you need.
If you have a choice over the logs you burn, it’s worth noting that harder woods (like ash and oak) will give you longer lasting embers than softwoods like pine or firs.
That’s not to say you can’t cook with the latter, you absolutely can, just that harder woods will give you slightly more control.
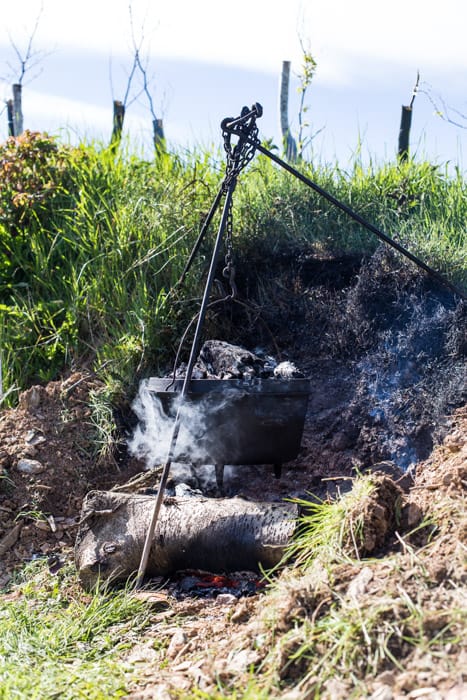
When you are starting to get some good embers, and you’re almost ready to start cooking, you want to split the fire in two.
On one side you want to keep the fire burning.
Think of this as your ’ember factory’.
You don’t need this fire to signal an aeroplane or heat the woodland for the next 6 hours. Just to keep up a good production of embers that will see you through the entire cooking process (and likely boil water afterwards for coffee & clean up).
Feed it when it gets low with smaller logs, about 2-4 inches in diameter is perfect.
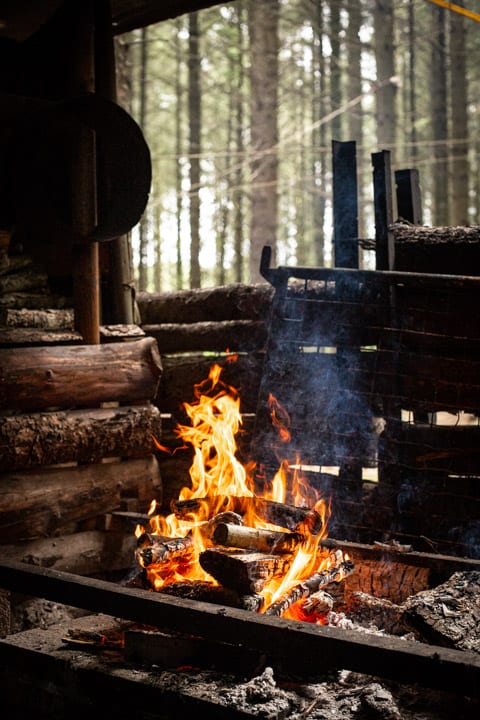
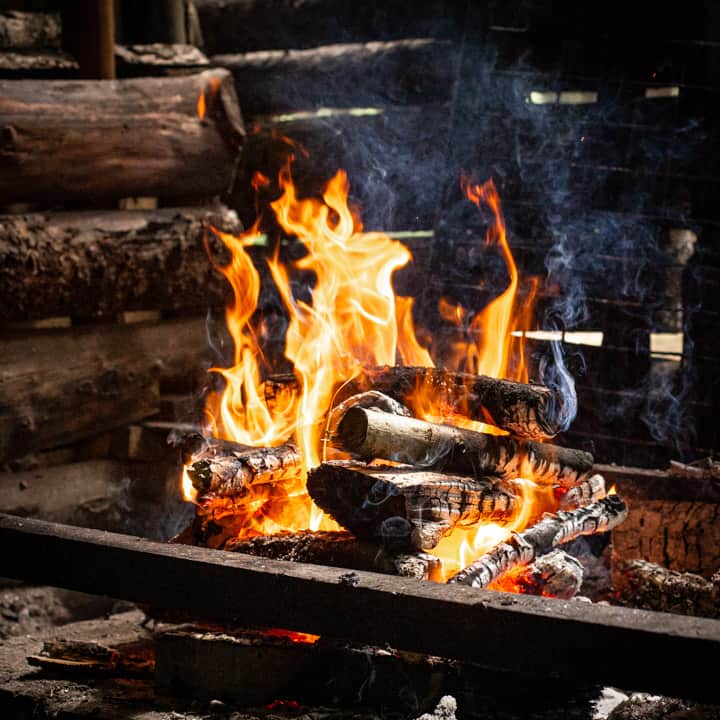
On the other side, you’re going to create your cooking fire.
Here you don’t want any burning wood, only embers.
Start by creating a nice bed of hot coals on the base.
You can use a stick, long-handled tongs, welders gloves or a shovel to move coals.
And now, you’re ready to cook!
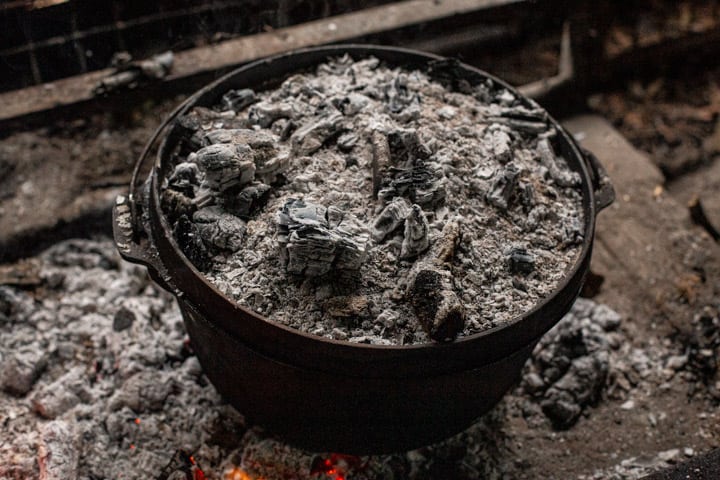
Pop your Dutch oven on the coals, and then pile more embers up onto the lid.
This will create the perfect cooking conditions – heat from above and below – in which to cook your chicken into a crispy, golden piece of heaven.
How Long to Cook a Chicken in a Dutch Oven on a Campfire?
OK, there are no hard and fast answers to this I’m afraid as there as so many variables such as:
- The type of wood, and whether the wood is green or dry and well seasoned
- The temperature of the chicken going in
- The internal temperature your Dutch oven gets to
So, let me tell you how I guesstimate the cooking time.
Plus the 2 methods I have for ensuring the chicken is safe to eat and won’t give anyone food poisoning!
Whenever I cook chicken, either in the oven or the woods, the old adage “20 minutes a pound, and 20 over” is my starting point.
If you know that your bird weighs 4lbs (around 1.8kg). You need to cook it for 100 minutes (20mins x 4lbs = 80mins, + 20mins = 100mins, or 1 hour 40 minutes)
So as my fire will likely burn hotter than my oven set at 180°C, I would start checking the meat at around the 1-hour mark.
If it is still raw and bloody inside, but show signs of burning on the outside, I would move some embers away and aim for a slightly cooler roast.
Click here to watch this recipe over on YouTube!
How to Check if a Chicken is Cooked and Safe to Eat
Whilst no one ever wants to get food poisoning, the thought of getting it whilst camping a definite no-no!
So, how do we make sure it’s safe and fully cooked through when our heat source is so variable?
Method 1 – Cooking by Temperature
If you are nervous about cooking chicken, are feeding customers, children, pregnant ladies or the elderly, or just prefer to be 100% safe, you need to test the internal temperature of your chicken.
To do this you’ll need a digital thermometer.
I use a Thermapen (see below for more details) and test it by sticking the probe (the pointy end) into the thickest part of the meat.
Chicken is safe to eat at or above 74°C (165°F).
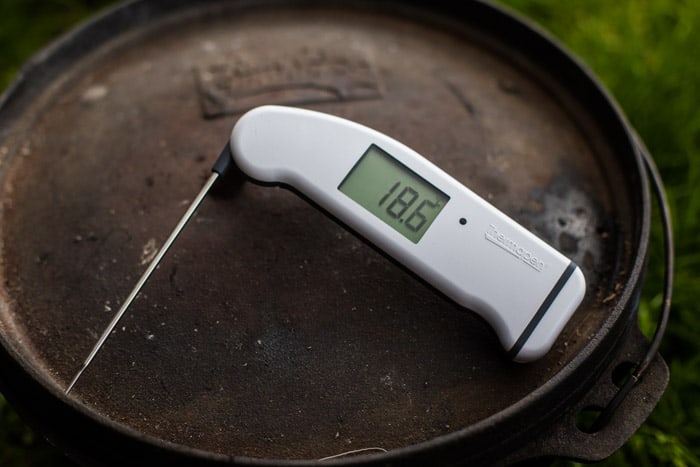
Thermapen are high-quality electronic thermometers that are proudly made in the UK. They come in a variety of fun colours, the LCD display is large and clear and auto rotates so it can be used in either hand and any position (handy when trying to dodge the smoke!)
They help you get the perfect steak every time, take all the guesswork out of jam making and make a great gift to anyone that is renowned for serving up burgers and sausages that are incinerated on the outside whilst still dripping in the centre!
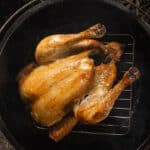
Method 2 – Cooking by Sight
This is the way that my Nan and my Mum taught me to check if a chicken was cooked.
It’s very simple, and you don’t need any equipment.
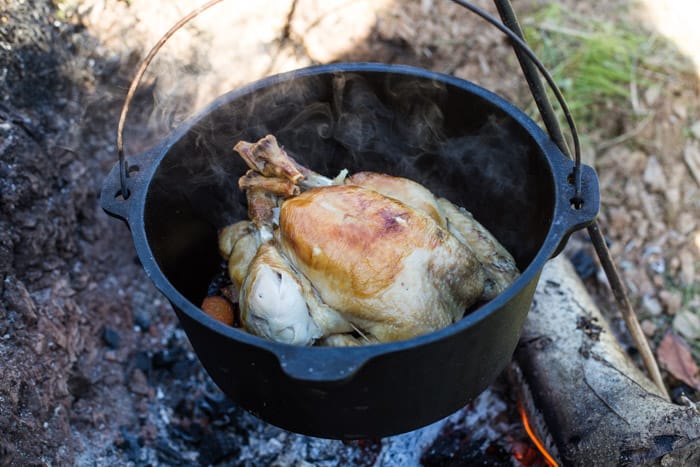
Simply pull one of the legs away from the body.
If the bird is cooked, the leg will pull right back with no tension, splitting the skin and showing the inside of the joint with no effort.
Very often the bone will slip right out (see the video for proof of this!).
If the bone tugs, or stays nestled in close to the body of the bird, then it needs more cooking time.
Dutch Oven Roasted Chicken Recipe
The following ‘recipe’ is a little vague for obvious reasons.
But hopefully, it will give you the confidence to try roasting a campfire chicken next time you’re camping.
Oh, and if you’re after a more foolproof camping recipe, my Cowboy Stew recipe is a brilliant way to feed a crowd!
Take note of the weight of your chicken and guesstimate how it will need to cook: A chicken takes 20 minutes per pound of weight + 20 minutes extra.
(please note this is not at all scientific as I have no way of testing the internal temperature of the Dutch oven - see above to find how to ensure the meat is cooked and safe to eat)
About an hour before you want to start cooking, build up a good strong fire.
Separate the fire into two - a small fire on one side producing new coals and a good bed of embers on the other side for cooking on.
Place a trivet in the bottom of your Dutch oven. You can also use a layer of root vegetables, or even a bunch of scrunched up tin foil. Anything that will raise the chicken off the bottom of the pan to prevent it burning.
Lay the chicken on the trivet. Pop the lid on and place the Dutch oven on to the embers. Using a shovel, tongs or a welders glove, cover the lid of the Dutch oven with hot coals.
Keep an eye on the time (or set an alarm on your phone) for halfway through the guesstimated cooking time.
Using a digital thermometer (or Method 2 as mentioned above) check to see if the chicken is cooked all the way through. If not, replace the lid and cook for longer.
When cooked remove from the fire and serve in crusty baguettes with mayonnaise. Delicious!
Huge thanks go out to Thermapen for sponsoring this recipe and helping me to keep bringing you tasty content, for free! As always all thoughts are my own. Please note that links are affiliate links.
Janie x
Eb Gargano says
Love this idea…I must confess, I don’t do much cooking on campfires…but I do lots of cooking in my dutch oven, which I recently acquired and ADORE for making cooking all manner of things so much easier and just for generally looking lovely! I am yet to cook a roast chicken in it so that might well have to be tried! Will be bookmarking your recipe for some guidelines. I love the idea of a Thermapen (I also get quite stressed about the possiblity of feeding people raw chicken), but don’t own one yet, so I am definitely going to enter your comp – would love a green one, if I win :-) Eb x
Jemma @ Celery and Cupcakes says
Can you believe that I’ve never been camping. I think I need to go just make this chicken dish, it looks wonderful!
Jane Sarchet says
Never been camping??!
Sophie says
Yum! Love the look of this recipe – however not so sure on the camping ;) will have to try and recreate this at home.
Jane Sarchet says
Haha, camping is so much fun Sophie! Honest ;)
Tracey Peach says
I would pick a Pink Thermapen :)
Jen. says
Fab post. I’d pick a blue thermapen.
Chrissie Curtis says
I would choose a white one!
S Bufton says
I would pick a black Thermapen
Tracy K Nixon (@tracyknixon) says
I would choose a Pink Thermapen :)
Zoe C says
I would choose a white one
sylvia says
Great prize
tracey ryder says
would love a red one
C Kennedy says
I like the white one :-)
S Edwards says
I would pick a black Thermapen
Lee Ritson says
I’d go for the red one if I got to choose. Would happily take any though! :P
Rachael G says
I would choose a black one.
Paul Wilson says
I would pick a white one.
laura banks says
brilliant i would go with the blue
Simon M says
Not fussed on colour to be honest, but would be extremely handy to have one though!
Joy B says
I would choose the purple one.
compedd says
I don’t really mind. But if I have to pick one, it would be black.
Lisa Parker says
I would choose the red one
sam macaree says
i would choose black
cluckyhen0 says
I would choose a red one
Karolina Rozwarska says
I wouuld want a purple one!
glenn hutton says
I would pick a black Thermapen
Louise Smith says
I would choose the white one please
Helen Adams says
I’d pick the green one
amy bondoc (@AmyAmybondoc) says
id pick a white one, i love this recipe!!
Anthony Harrington says
I would pick the black one
Charlie says
I’d use this method to cook on the barbie. . looks to be a better way to retain flavour and not cremate your food :-)
Amanda Hart says
I would choose the red one :)
Becky Duffy says
I think I will choose the white thermapen, they do look super useful! :)
Lorraine Tinsley says
I’d pick a black one
Heather S says
I would choose the white one :)
John Forbes says
I’d go for a red Thermapen
Frances H says
I’d choose a green one. Thanks.
Lucy B says
blue thermapen xx
Tracey W says
I would chose a white one
kimneville1 says
I like the blue thanks
Hassni says
I’d pick the red one.
jennifer thorpe says
I’d choose a red one
Jo Carroll says
I’d pick the RED one too as it would remind me of the importance of cooking my meat to the right temperature :)
helen tovell says
I would pick a red one
Ellie S says
I’d go for green – my new favourite collour :-)
kim plant says
white please x
DEBBIE DAVIES says
It would have to be pink for me! xx
choclette says
Absolutely fab video Janie. You are a natural and so much better live than the written ones. Loved it.
Jane Sarchet says
Aww, thank you Choclette :)
Sarah Brokenshire says
A red one xx
Holly Gibson says
I’d like the black one. Nice and simple
Susan Hoggett says
black is my favourite
Solange says
I would pick a black Thermapen.
Rowan says
I Love camping and love cooking / baking in my Dutch oven although I have never done a roast chicken. That is to change this weekend. I would choose a white one.
Heather T says
The red Thermapen would match my kitchen accessories the best
Ellen Sheppard says
I would pick a red one :-)
Jodie Harvey says
i would go for purple to match my kitchen
lemonpiez says
I’d pick a pink thermapen to match the decor in my kitchen
Maxine G says
I’d pick the black thermapen
Lesley Bain says
The lovely sunny yellow one would be my choice :) Chicken looks yummy x
sadiewoohoo says
Id go for red as it would match my kitchen perfectly
Rich Tyler says
RED I think :)
sparrklie says
I’d choose the white one.
carolyn joyce says
Yellow please!
Jess Powell (Babi a Fi) says
I’d pick the red. :)
barbedwire71 says
the white one would be lovely.x
Frances Heaton says
I would choose white.
Kat Lucas says
I’d pick the red
claire blaney says
I would to have a blue one, & thank you for fab giveaway
Julie Kenny says
I would love a red one – thanks for the chance to win xx
Lisa Wilkinson says
I’d choose the white one :)
joanne torrance says
the black one please
Katie Skeoch says
I’d go for the green thermapen
stuart payne says
green please
Beky Austerberry says
Black which is my fave colour – thanks for the chance.
stephen holman says
red would be my pick!
joy buckenham says
black would be for me
Kate Carvey says
Wish there was smellavision it looked so yummy, great easy recipe thank you x
Kate Carvey says
Any colour pen if I’m lucky enough to win :)
Val Pownall says
How brilliant! Making me hungry! Great that they come in such a good range of colours. I’d choose the light blue one – my favourite colour.
Aaron Milne says
Would love a yellow one
Darren says
The blue one
Annette Oliver says
I would choose a black one
Farhana Haque says
I’d love a black one please
Vicki says
That chicken looks delish! But still, no camping for me ;-) I’d go with a black thermapen I think x
Karen R says
I’d love the purple one :)
Teresa Lee says
I’d choose the black one…Thanks
Keri Jones says
I would pick an orange or cornflower blue one. Awesome giveaway, having one of these would stop me worrying about undercooking the chicken!
LESLEY BRADLEY says
A red one :)
Vicky Hawkins says
I would pick a black Thermapen
ELIZABETH DOODY says
Not that fussy but red would go with my kitchen theme LOL
allison mary says
I would pick a pink one but think hubbie would complain ;) white it is!
allison.
Sarah Parker says
the black :)
Elizabeth Hinds says
I would pick pink :)
Emily Clark says
The black one. :)
Kathleen Bywaters says
A red one would be wonderful! :)
Pam Smith says
I’d choose a black one please
Andrea A says
I’d pick a green Thermapen
Eileen Teo (@etspeaksfrom) says
I love to win a red one please.
Sammie says
I have cooked and eaten over a campfire before and it really is a magical experience. I wouldn’t have been brave enough to cook a whole chicke so a thermapen would be perfect, in white please? Especially as I am THE worst steak cooker ever!!!
Gillian McClelland says
I would pick yellow
munchiesandmunchkins says
Red please! Thanks for joining Eating Al Fresco.
Michelle O'Neill says
a Pink Thermapen
Heather Haigh says
Love this ! Makes me want to go camping !
Jayne says
Thanks for this, looks really good.
Hayley Elvin says
I’ve got a thermapen and its really handy.
Michelle Sykes says
I would choose a black one
Terrie-Ann Wright says
I would get the purple one
Pamela Gossage says
I like the white one
robyn297 says
I would like a blue one
Mickie Bull says
I would choose a black one!
Emma h says
I’d pick red
Karen Howden says
White please
Keshia Esgate says
Pink please
Elzbieta Znyk says
red please
Jayne Townson says
I’d like the blue one please.
jayne hall says
would pick the pink one ive never been camping
Tammy Neal says
I’D love a Blue Thermapen please x
Deborah Mackenzie says
I would pick a blue one
Ruth Wollerton says
I would love a red one for cooking perfection. Thanks
Scott Fallon says
the black thermapen
Lisa Everaert says
I would love a RED one.
Ian Campbell says
I’d love the red colour please :)
fionajk42 says
I’d want a colour that can’t easily get mislaid, maybe the bright green
Justine Meyer says
i WOULD LOVE ONE OF THESE, i WOULD PICK A BLACK ONE X
joanne cox says
Black one please. I’ve always use campfire on holidays.Love it! Great time to spend time with my children.
Sarah Chappell says
I love these I would choose green but tbh happy with any colour
Karl Borowy says
choose a white one
Iain says
I would pick a black Thermapen
Lynne OConnor says
Really not bothered about colour as it’s something that would be kept in a drawer. I’d probably choose black if I had to choose one
Steven Beasley says
Thanks for this. Going camping next month and will give it a go
Patricia Avery says
The black one would be my choice as it would match most of my kitchen gadgets which are either black or stainless steel :)
clairedavey51 says
would have to be my fav colour yellow xx
Jackie ONeill says
I would love the green one
Stuart Payne says
White
Alisa Moore says
Black
Emma gough says
I really don’t mind what colour but if I could probably a black one please
Emma Gee says
We love cooking in a dutch oven, use it at home and when we go camping too. Never done a whole chicken but will try it next time were away.
Em x
Cat B says
The zingy yellow
Brenda Wilkes says
I would choose blue to match my new colour scheme.
Kat Glynn says
I would love the red one thanks :)
Desicart says
I would choose Red