This is 3 of the 4 stages a mealworm (Tenebrio molitor) goes through. They are all sat in the bowl of a teaspoon to give you an idea of their size.
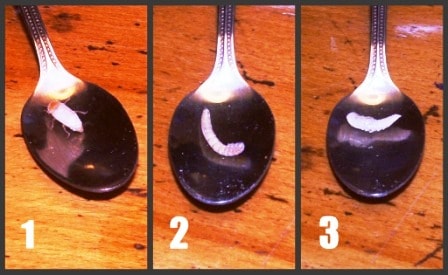
- In the first picture is a freshly hatched Darkling beetle. They are white like this for a few hours before turning brown, then black. They become sexually mature after a week or so, mate and lay eggs which are apparently the size of this full stop . (My eyesight must be failing as I’ve never actually seen an egg, and as the macro function on my camera is broken, I had little hope of snapping one either.)
- The eggs hatch out into larvae, or meal worms, at which point they become the most interesting to us. They are a fantastically nutritious live food, consisting of *20% pure protein and *12% fat, both of which are difficult to grow for chickens from plants. They are used to feed reptiles, birds and fish. They start off teeny and very difficult to see, then grow to about an inch or so. As they grow, they shed their exoskeletons several times until, with the last shed, they morph into a Pupae.
- This isn’t their most attractive stage it has to be said, they resemble weird little aliens. They lay dormant for a week or more as a pupae until they finally crawl out of this last shell as a beetle.
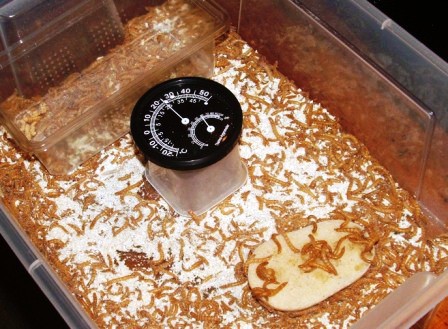
Starting your own meal worm farm
Sourcing your breeding stock
You can find your starter mealworms easily online, or from large or specialist pet shops. Ensure you buy ‘mini’ or ‘standard’ and not ‘giant’ mealworms, as these appear to have been dusted with a hormone powder which makes them grow larger, but renders them infertile. I got mine from Pets at Home, where 120g cost me £6. They had no regular ones left in stock, so I bought the mini ones which are just a younger, smaller version so they took longer to ‘grow up’! I have since seen tubs of them in the store that have already started morphing into pupae, which would save you a few weeks of time in getting them breeding.
Housing
Plastic shallow tubs (with smooth sides to stop the larvae or beetles climbing out) with lids are perfect for your worm colony. The lids either need to be left ajar or have air vents cut in them for ventilation.
I would recommend two tubs initially, you can always buy more if you’re planning to start a home business selling them to friends or online. The beetles live and lay eggs in one, the mealworms live in the other. I keep a smaller tub inside the latter to hold the pupae as they don’t eat, drink or move at this stage so need very little room.
I know of a guy who has been breeding them for years and keeps all four stages of his grubs in one tub. This is fine if you just want to pull out the odd treat for your flock or for the wild birds in your garden, however to maximise output you’d be better separating them as the different stages have cannibalistic traits and you will lose some eggs and pupae to the beetles & mealworms.
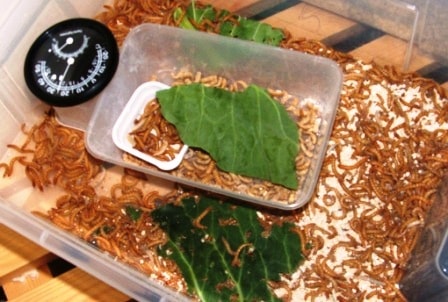
Food
They eat and live in a layer of cereal which is known as the substrate. I currently use oats, but others use bran or other cereals. I grind my oats to make it easier to separate the grubs from the bedding but you don’t need to do this.
Water
They also need moisture, however in my experience this is the trickiest part to get right. Too much moisture will cause the substrate to grow mould and can attract mites, both of which may leave your worm farm doomed. On the flip side, too little moisture makes the shedding of exoskeletons difficult and can cause deformed beetles.
Putting a bowl of water in the tub will just cause the worms to drown, they need moisture in their atmosphere and they enjoy sucking the moisture out of foods.
I have heard of folk using a live insect gel which holds the moisture away from the substrate, but as I’m trying to keep this as simple and as economical as possible, I prefer to find other ways.
A small potato, sliced in half works well. Place it skin side down to stop the substrate getting wet, the worms soon suck the life out of it and drill little caves into it. Cabbage or lettuce leaves, apples, carrots all go down well and occasionally I push the bedding back and pop a couple of cubes of cat food in – not only do the worms love this, apparently it improves their protein levels so you may wish to ‘gut load’ them just before feeding to your hens.
I have found that the potato lasts the longest, it keeps the moisture levels pretty high without going mouldy and only needs changing every other day.
Temperature
In my experience, they will survive quite happily at room temperature. However, when I bought a temperature & humidity gauge (a couple of quid from ebay) I realised that even with our heating on, the room wasn’t warm enough to promote speedy growing. When they got moved into our airing cupboard, the difference was incredible.
I try to keep the temperature of my worms and beetles between 22 & 28°c.
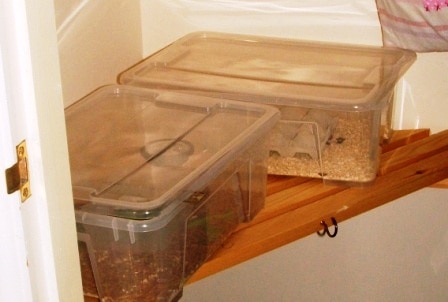
Humidity
I aim for 70% humidity. It often drops after I’ve taken the lid off to clean them out or if the potato is a couple of days old, but it soon picks up again with the lid back inplace and/or a fresh piece of food.
Cleaning them out
Out of all the critters I have raised, these guys are the easiest to clean out! They poop out a dry sandy substance known as frass. This collects under the substrate, so it’s just a case of sieving the worms, bedding & frass over a clean bowl/bucket and the frass will sift out. So easy! They don’t generally smell, although you do need to regularly pick out any dead ones (use tweezers) and I sift them out every couple of weeks to avoid any gentle pongs (purely as they live in my airing cupboard!)
When cleaning out the beetles, you need to keep all the substrate for a couple of months as there will (hopefully) be loads of eggs in amongst it.
I hope you are considering starting your own little farm, if only for treats for your hens or wild birds. As always, do let me know how you get on and holler if you have any questions!
* with thanks to Grubco.Com for this info
Shared with The Prairie Homestead Barn Hop, TALU
Karen says
A facinating insight into breeding mealworms, really informative. I feed my hens dried mealworms, I’m guessing the protein value would be less than live? I’ve never used live before but wouldn’t have a problem doing so.
HedgeComber says
Thank you Karen!
Interesting point re the protein, to which I have no idea! I guess the fat element could go rancid, but I can’t imagine the protein level would be reduced by very much once dried?
Owen says
As a % by weight, dried mealworms will have more protein(and fat) than fresh ones. Obviously, each individual worm has the same weight of protein and fat as a live one. If you are buying the worms rather than breeding them it is more cost effective to get dried and easier to store.
HedgeComber says
Cheers Owen, makes a lot of sense.
Karen says
Thanks for the info, my hens adore them and they really appreciate them during a moult!
April says
hmmm, I wonder if this would be cheaper than buying mealworms for my daughter’s Bearded Dragon….
HedgeComber says
I would say definitely, off the top of my head I think each female beetle lays 350 eggs in her life. That’s a lot of mealworms!
Thanks for stopping by April x
Amy @ Homestead Revival says
Well, I must say I found this incredibly interesting. I have some meal worms in a container out in the coop, but I confess they get VERY little attention because I really haven’t known what to do with them. Once in a great, great while, I’ll open up the container, let the “girls” peck a bit, add a potato, and close it back up.
So I’m wondering… when you want to feed the worms, how are you doing it? Are you digging through there and finding the meal worms and pulling them out? (Not sure I’m up to that :-o )
HedgeComber says
Hi Amy, thanks for popping by!
I just kinda grab a handful of the worms and give to the hens. If you don’t fancy touching them then use a scoop or little pot, but letting the girls peck them out is fine too. Hens will happily eat the substrate too, so you don’t need to separate the worms from the oats.
Does your tub contain a mix of all the stages of mealworm (beetle, egg, larvae & pupae)? If so, you’ll be losing some of those valuable eggs and laying beetles every time you scoop some out to the hens, so if you want to maximise the production (to cut back on chook feed for example) then you ideally want to separate them, which will mean getting your hands in there – or bribing someone else to!
Janie x
Chrissy @ The New Me says
What a great idea! We’ve been toying with the idea of DIY chicken feed, and this would be a great addition. We already raise worms for the garden, so this wouldn’t be too much of a stretch. Thanks for the inspiration and the information!
HedgeComber says
Excellant! As protein is the hardest part of chook feed to grow from plants, these little critters could be the perfect answer for you! Janie x
Lian Peet says
Love the sound of this! With grain sourced locally, opportunity to free range, and these little beauties, we should be all set …right? Thanks for sharing it, sounds manageable :-)
HedgeComber says
I think you’re right Lian. So long as the hens are out on grass, with grain & this amazing protein their diet is sorted. And you’re right, it is totally manageable to have a farm in the airing cupboard! Janie x
Shreela says
Thanks for explaining how to raise mealworms, I’m going to try it. I don’t understand what pongs are though: “to avoid any gentle pongs (purely as they live in my airing cupboard!)”
HedgeComber says
Your comment made me smile Shreela, and made me realise that I use many strange English words!
A pong is a smell, not a full on stench but a smell all the same!
Janie :)
Meg says
This is freaking amazing! Why didnt I think about this for our chickens? With the price of feed going up by the week here in the states, I will definitely be looking into this. Hubby will not be pleased, but oh well. Another one of my “experiments” and if it will help us to save on the amount of food for the chickens, why not?!? :-) THANK YOU!
HedgeComber says
Ha Meg, you’re welcome! Your hubby sounds a LOT like Jonny :)
Please let me know how you get on with them, Janie x
Anne Kimball says
I’ve heard it suggested to grow mealworms for hen treats, but never knew how. Now I do! Thanks for this very informative tutorial! Also, thanks for linking up with the TALU!
HedgeComber says
Thanks Anne, I hope you give it a go :)
TALU is now on my weekly hop rounds, so I’ll see you there next week (and I’ll even try and get it right!)
Janie x
Sharm says
This is a great idea and I love the way you’ve made it all sound so simple! This is my first time with TALU & you are my 1st visit – well worth it! Sharm
HedgeComber says
Sharm, that is the sweetest message! I hope you give it a go, your hens will truly thank you for the effort!
Thank you for taking the time to visit and comment
Janie x
Rachel Turiel says
Wow, that is one impressive mealworm farm. Wish I could do this for my chickens. Maybe someday…
HedgeComber says
Hi Rachel, it’s not difficult to set up, and your girls would be eternally grateful I’m sure!
Janie x
Lurch (@GunCulture) says
Hmm. I’m thinking a heated propagator might be just the job for this lark.
HedgeComber says
That would be perfect for them Lurch :)
Thanks for visiting!
Janie x
Carolyn says
Really LOVE your blog! Everything I’m interested in! I love my chooks & my lil farm, I’m going to have fun exploring here :)
I’m really looking forward to starting my mealworms
Jane Sarchet says
Thank you Carolyn! Good luck with the grubs, your chooks will love you for it :)
Janie x
KATHY RAFFETTO says
I’ve been trying this for a couple of months now. I have lots of beetles and they do love to mate but I’m not seeing any off spring. Do I just need to be patient?
Jane Sarchet says
Yep, hang on in there! Start checking through the floor and bedding, and you’ll see teeny, tiny little mealworms.
Janie x
Therese says
Thanks for sharing.
I only started my farm about a week ago so I still only have larvae at this stage.
The hardest part is leaving them in there to grow.
I keep nicking a few for my two week old chicks they love them so much.
I am wondering if I have to much oat bran in my tub. I have my tub about 1/4 filled with rolled oats and oat bran. I then put 200g of meal worms but I have fed so many of them my hens and baby chicks :/
Jane Sarchet says
It’s fine Therese, the oats won’t go off or anything. I know what you mean about feeding too many, but then that’s why we’re breeding them – to get a constant supply! It doesn’t matter if you buy another tub every now and then to top it up with, it’ll still be much cheaper than just buying them!
Janie x
Therese says
Jane just one quick question :)
I have my worms in a deep tub with about 8cms (3″) of oats and bran. Will I see the pupae on top or will I have to dig to find them?
thanks
Jane Sarchet says
The Pupae kinda lounge around on the surface, they’re dead easy to spot x
Jen says
I was beginning to think my mealworm colony was a dud, 5months in they are mating and laying eggs but no sign of hatchlings. I decided to sieve the frass yesterday and in the collection bucket (precaution and it’s meant to be good for the garden) I’ve counted 5 babies though there may be more. Happy times.
Jane Sarchet says
Yay! Way to go Jen! Do you keep all 4 stages together in one tub? If so, you may find the mealworms and the beetles are eating the eggs and the babies.
Janie x
Jen says
I do keep them all together; I was going to get a 3 tier system going for lack of space for 3 boxes but I haven’t found anything suitable yet. There are babies appearing all the time in the frass container. I’ve got a carrot in there for them :)
Jane Sarchet says
Brilliant! Good luck :)
Janie x
michael says
thank you for the detailed information. I have beeb buying livemealworms to feed bluebirds, it gets expensive. So I decided today that I would research how to breed the darn things myself.
thank you,
Michael
Bluebirds Eating Live Mealworms
Jane Sarchet says
Fantastic news Michael, you’ll be saving yourself a fortune from now on!
Janie x
Georgina Montgomery says
Hi….I have just bought my self 4 packs of mealworms from pets at home and 3 out of he 4 boxes had pupae in them ( as well as the mealworms) :) they are all now snuggling down into their new home ;) Your information on breeding mealworms was very informative and made it sound easy….especially for the likes of me who just likes things to be plain and simple :D (Is the cat food you give the worms meat or dry food?) My ex battery girls are going to be in for a real treat at some point, thank you.
Georgie x
Jane Sarchet says
Hey Georgina that’s great news, thanks for letting me know how easy your set up was!
I give them the occasional lump of wet cat food, but really only one or two lumps at a time, and don’t let the bedding get wet otherwise you’ll get mould and attract bugs.
Your chooks are going to be in heaven ;)
Janie x
Harold k says
How often do you feed your chickens your treats and what quantity of mealworms? We have 14 laying hens and 3 roosters, what kind of size mealworm farm would you practically recommend? If I feed them a certain amount of mealworms (x grams or ounces) what quantity of chicken feed could I reduce; I.e. Is a certain weight of mealworms equivalent to or more nutritious than standard chicken feed? I am also interested in reducing our coat of chicken feed which we buy in 50 pound bags, but I am not sure if I can raise that many mealworms!!
Jane Sarchet says
I honestly think Harold that if you wanted to make a visable dent in your feed bill, you’d be needing to raise a LOT of meal worms, and would probably need to look at a professional size set up.
A way to work out the nutritional balance is to look at the nutrition label of your store bought feed, against the nutritional data provided by Grubco here http://www.grubco.com/nutritional_information.cfm
I grow them as a treat, so 3-7 times a week I’ll throw a few in the chicken run to keep the girls happy. This makes zero dent in the food bill.
Good luck, and if you do set up a large set up, please let me know!
Janie x
Harry says
Hi Jane I have just stumbled upon your page, I have been researching meal worms on the WWW and have found nearly as many ways to breeding meal worms as there are sites.. It seems there varying opinions on the life cycle of meal worms, Some say the beetles can fly and some say they can not. but in general the core information seems to match, I started out with 4000 worms and a week later I had 750 not a good result. So I am about to start again with another 2000 and I hope I have gleaned enough information to have a little better results this time round, I have a substrate of Chick Starter Crumbles and Rolled oats put through a blender to make it easier to separate them if I manage to jagg it this time, I managed to get a small electric warmer/seed, starter come green house, so I can keep them reasonably warm as we are just going into winter here in Australia and we can get up to minus 16c I am thinking about the humidity at the moment and also waiting for the electronic Thermostat/Hydrometer to arrive from China,
I think your site is the relatively informative and keeps things to the KISS standard,
Which is great for me. I the meantime I am thinking of placing a damp sponge in my container just to make sure it isn’t too dry. The substate seems awfully dry to me but then I am not a meal worm.
Thank your for the Information and hopefully I will have some additions to my mealworm family soon.
Regards Harry
Jane Sarchet says
Good luck Harry, and keep an eye on the humidity with the sponge being in there!
Janie x
Amanda says
interested to know what feed should I give to my beetles, which I have separated from the remaining mealworm stock?
Gary says
hi, Jane had a good read of the comments posted.
Very good i am intrested to know how long after removing the beetels
can i expect to see anything in the substrate?
Jane Sarchet says
Depends how good your eyesight is Gary! They’re teeny tiny to start with but keep checking and you’ll soon start to see them wriggling and growing :) It takes a few weeks for them to get to usable size.
Janie x
Jennifer King says
My colony is doing great. I have them in a 4 tier storage box. Loads of eggs in the frass. I did have an issue with white mite when my friend didn’t change the carrot while I was in holiday. All was not lost, I put the substrate in a smaller container into a slightly larger container with water+a bit of wading up liquid in the bottom, the mites climbed out of the substrate and into the water.
Jane Sarchet says
Great idea Jennifer & so glad you managed to save the day!
Janie x
Amanda says
This is one crazy good DIY tutorial! What brought me here is the fact that I have to start breeding mealworms for my pet fish aquarium. I have a couple big Oscar fish and they love these things while they are still full of protein and don’t contract disease like some other foods out there. I just want to give a shout out and say thank you for the tutorial. I found other guides but not as good as this one haha. Thanks!
Jane Sarchet says
Amanda, you are officially my favourite commenter this week :D
Glad to help, do let me know if you have any problems with the little darlings ;)
Janie x
Karen says
Your tutorial, pictures and comments, brilliant, looking forward to my setup taking off, have looked at a few others sites, a bit extra information each time, is needed, still learning every day.
Jane Sarchet says
Thanks Karen, so glad I could be of help! Good luck with them, I find them quite fascinating (as do the chickens!!!) :)